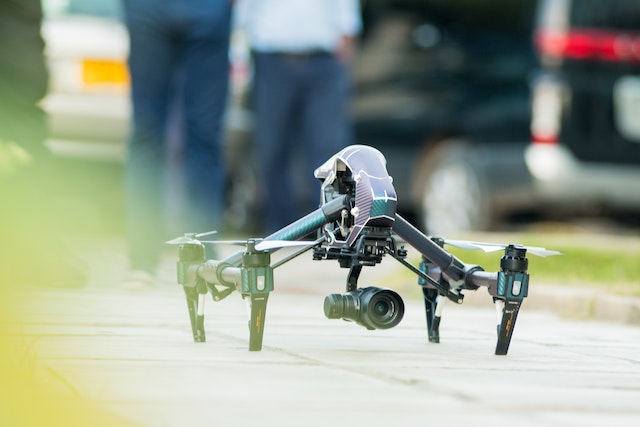
Drones have revolutionized the world of photography and videography, allowing us to capture breathtaking aerial shots and stunning landscapes. However, to truly harness the power of a drone’s camera, it’s essential to optimize the camera settings. In this article, we will explore the various aspects of drone camera settings and how to make the most out of them.

1. Introduction
As drones continue to gain popularity, understanding and adjusting the camera settings become crucial for achieving professional-quality results. By optimizing the settings, you can enhance image and video quality, capture vivid colors, and achieve the desired creative effects. Let’s dive into the world of drone camera settings and explore the possibilities.
2. Understanding Drone Camera Settings
Before we delve into optimizing the camera settings, it’s important to understand the fundamentals. Here are the key aspects of drone camera settings:
2.1 Camera Modes
Most drones offer different camera modes, including automatic, semi-automatic, and manual modes. Each mode provides varying levels of control over settings like shutter speed, aperture, and ISO sensitivity. Understanding and utilizing these modes can significantly impact the outcome of your aerial photography or videography.
2.2 Shutter Speed
Shutter speed determines the duration for which the camera’s sensor is exposed to light. Faster shutter speeds freeze motion, making them ideal for capturing fast-moving subjects, while slower speeds create motion blur, adding a sense of dynamism to images. Finding the right balance is crucial to achieving the desired effect.
2.3 Aperture
Aperture refers to the size of the camera’s lens opening. It affects the depth of field, which determines how much of the image is in focus. Wider apertures (lower f-stop numbers) create a shallow depth of field, ideal for separating the subject from the background, while narrower apertures (higher f-stop numbers) ensure a larger area in focus.
2.4 ISO Sensitivity
ISO sensitivity determines the camera’s sensitivity to light. Higher ISO values allow for better performance in low-light conditions but may introduce noise or graininess in the image. Finding the optimal ISO setting based on the available light is crucial to maintaining image quality.
3. Adjusting Camera Settings for Different Scenarios
Now that we understand the basic camera settings, let’s explore how to adjust them for various scenarios you may encounter during drone photography or videography.
3.1 Sunny Conditions
In bright sunlight, it’s essential to balance the exposure to prevent overexposed or washed-out images. Consider using a lower ISO, faster shutter speed, and narrower aperture to let in less light and maintain optimal exposure levels.
3.2 Low-Light Conditions
When shooting in low-light conditions, such as during sunset or at night, it’s crucial to adjust the camera settings to capture enough light. Increase the ISO sensitivity, use slower shutter speeds, and consider using wider apertures to allow more light into the camera sensor.
3.3 Capturing Fast Action
To freeze fast action, such as a moving vehicle or a flying bird, opt for higher shutter speeds. A faster shutter speed will help avoid motion blur and capture the subject in sharp detail. Additionally, consider using burst mode to capture a series of images in rapid succession.
4. White Balance and Color Settings
White balance and color settings play a vital role in achieving accurate colors and a pleasing overall look in your drone photographs and videos.
4.1 Importance of White Balance
White balance ensures that the colors in your images appear as they do in real life. It corrects any color casts caused by different light sources. Understanding white balance and how to adjust it can help you capture images with natural-looking colors.
4.2 Adjusting White Balance
Most drones offer automatic white balance, but manually adjusting it can yield better results in challenging lighting conditions. Experiment with different white balance presets or use custom white balance to achieve the desired color temperature.
4.3 Enhancing Colors
To make your drone photos and videos visually appealing, you can enhance colors during post-processing. Adjusting saturation, vibrancy, and contrast can bring out the vividness and richness of the captured scenes.
5. Focus and Depth of Field
Achieving proper focus and managing depth of field can significantly impact the quality of your drone imagery.
5.1 Autofocus vs. Manual Focus
Many drones offer autofocus capabilities, which can be useful for capturing sharp images without manual intervention. However, in certain situations, such as when shooting through obstacles or capturing a specific subject, manual focus allows for more precise control over the focal point.
5.2 Controlling Depth of Field
Controlling the depth of field allows you to emphasize certain elements in your shots. By adjusting the aperture and focusing distance, you can create a shallow depth of field to isolate the subject or a larger depth of field to keep the entire scene in focus.
6. Composition Techniques for Aerial Photography
Composition is a key aspect of any form of photography, including aerial photography. Here are some composition techniques that can help you capture stunning aerial shots:
6.1 Rule of Thirds
The rule of thirds divides the frame into a 3×3 grid, and placing the subject along these lines or at the intersection points can create a visually pleasing composition.
6.2 Leading Lines
Utilizing leading lines, such as roads, rivers, or patterns, can draw the viewer’s attention into the image and add depth to your aerial photographs.
6.3 Symmetry and Patterns
Aerial perspectives often offer unique opportunities to capture symmetrical scenes or interesting patterns. Look for natural or man-made patterns and use them to create visually striking compositions.
7. Capturing Stunning Videos
Drones are not limited to photography; they are also powerful tools for capturing stunning aerial videos. Here are some considerations for optimizing camera settings for video recording:
7.1 Frame Rate and Resolution
Selecting the appropriate frame rate and resolution depends on the desired look and purpose of your videos. Higher frame rates, such as 60 frames per second (fps), allow for smoother footage, while lower frame rates, like 24 fps, create a more cinematic feel.
7.2 Shutter Speed for Videos
When shooting videos, it’s generally recommended to use double the frame rate as the shutter speed. For example, if you’re shooting at 30 fps, set your shutter speed to 1/60th of a second. This helps achieve natural motion blur and smooth footage.
7.3 Using ND Filters
Neutral Density (ND) filters are essential tools for controlling light and achieving proper exposure in bright conditions. They allow you to use lower shutter speeds or wider apertures without overexposing the footage.
8. Post-Processing Drone Photos and Videos
Post-processing is the final step in optimizing your drone imagery. Here are some considerations for post-processing your photos and videos:
8.1 Choosing the Right Editing Software
Select a professional editing software that suits your needs. There are various options available, ranging from user-friendly programs to advanced tools offering extensive editing capabilities.
8.2 Adjusting Exposure and Contrast
Fine-tuning exposure and contrast can significantly enhance the visual impact of your drone photos and videos. Adjusting these settings can help you achieve the desired look and highlight specific elements in your footage.
8.3 Adding Filters and Effects
Experiment with filters and effects to add a creative touch to your aerial imagery. From enhancing colors to creating dramatic effects, filters and effects can elevate the visual impact of your drone shots.
9. Conclusion
Optimizing drone camera settings is essential to capturing stunning aerial photographs and videos. By understanding and adjusting settings such as shutter speed, aperture, ISO sensitivity, white balance, and focus, you can elevate the quality of your drone imagery. Additionally, employing composition techniques and post-processing can further enhance your results, allowing you to create visually captivating and professional-grade content.
10. FAQs
Q1. Do I need to adjust the camera settings manually on my drone?
While many drones offer automatic settings, adjusting the camera settings manually provides greater control over the outcome. Experimenting with different settings can help you achieve the desired look and effects.
Q2. Can I use drone camera settings for both photography and videography?
Yes, most camera settings discussed in this article apply to both photography and videography. However, some settings like frame rate and shutter speed require specific consideration for video recording.
Q3. Are there any specific camera settings for capturing landscapes with a drone?
When capturing landscapes with a drone, consider using narrower apertures to maintain sharpness throughout the scene. Additionally, adjusting the white balance and enhancing colors during post-processing can bring out the beauty of the landscape.
Q4. Should I shoot in RAW format or JPEG format with my drone camera?
Shooting in RAW format provides more flexibility during post-processing, allowing you to make detailed adjustments without losing image quality. However, RAW files are larger and require more storage space. JPEG format is more compressed but limits the adjustments you can make in post-processing.
Q5. How can I ensure my drone footage is smooth and stable?
To capture smooth and stable footage, consider using a gimbal stabilizer. A gimbal reduces camera movements and vibrations, resulting in steady footage. Additionally, practicing smooth flight maneuvers and using slower shutter speeds can further enhance stability.


